Industry News, Trends and Technology, and Standards Updates

Derek Lindsey: Product Manager

Derek Lindsey has been an employee of Cimetrix for over 22 years. For 21 of those years, Derek was a member of the product development team and was involved in the development of several of Cimetrix products. He also has extensive experience working with Cimetrix customers in implementing their tool control solutions using our products. He recently joined the product management team to help add some technical expertise to product development. Derek has a bachelor’s in computer science from Brigham Young University.
Find me on:

Recent Posts

Exploring the Highlights of What's New With Cimetrix CIMControlFramework (CCF)

Posted by Derek Lindsey: Product Manager on Aug 30, 2022 11:45:00 AM

What’s new with CIMControlFrameworkTM (CCF)?

CCF is a software development kit (SDK) that enables users to design and implement a high-quality equipment control solution using provided components for supervisory control, material handling, operator interface, platform and process control, and automation requirements. CCF is built on the reliable Cimetrix connectivity products which provide GEM/GEM300/EDA interface functionality.

We released CCF 6.0 in March of 2021. Since that time, we have released four additional versions of CCF. In CCF 6.1 we added a continuous flow sample. We created a blog post for that sample that can be read here. We thought it would be fun to create another blog to keep readers up to date on some of the additional cool things that have been added to CCF in these subsequent releases.

GUI Changes

Many of the visible changes to CCF have been made in the operator interface.

New WPF OI for vacuum sample

The trend for most of our CCF customers has been to implement their equipment control application GUI using Windows Presentation Foundation (WPF). In previous releases, CCF had fully functional WPF GUIs for the Atmospheric and Continuous Flow samples. CCF now has a full WPF operator interface for the Vacuum Sample. The picture below shows the default main screen for the WPF GUI for the Vacuum Sample.

Op-interface-CCF-whats-newNew visualization library

In addition to full operator interfaces created with WPF, a visualization library has been added to CCF. In previous versions, visualizations were achieved using bitmaps that were updated when states changed. While the results were adequate, they did not scale very well, and it was difficult to customize the visualizations. The new visualization library uses vector graphics to draw the visualizations. This makes the lines and images in the visualizations crisp and clear regardless of the scale. It also allows for easy customization so that CCF application developers can create a visualization to exactly match their equipment. The Developer Guide and training labs have instructions for using the new visualization library.

The picture of the full GUI main screen above shows the default visualization for the vacuum sample. The following image is a visualization from the continuous flow sample.

Continuous-flow-CCF-Whats-newBoth visualization examples were created with the same visualization library.

Additional GUI changes

In addition to the GUI changes listed above, Cimetrix has made more changes to the GUI and added new screens for both WinForms and WPF. These screens include:

  • GEM300 E39 objects screen
  • GEM Traces screen
  • GEM Reports screen
  • EFEM Robot service screen
  • Aligner Service screen

Simulation Changes

Cimetrix has always been a proponent of using simulators as much as possible during equipment control application development and testing. (See blog post on simulation here.) Simulation in CCF has always been easy to use, but now it is even easier and has more functionality. Simulators should be interchangeable with hardware so that regardless of whether you are running against simulation or real hardware, the application makes the same calls and receives the same feedback. In the latest versions of CCF, Cimetrix has:

  • Added simulation for Kawasaki D60 robot
  • Added simulation for TDK TAS300 LP
  • Made simulation more extensible
  • Added simulation templates

Efficiency Changes

A change that is not very flashy but is probably one of the most important changes made to CCF is that the efficiency has been greatly improved. While CCF has never been a resource hog, there were some instances where it was using more CPU and memory than was needed. This was the case especially when GUI screens were being updated with large amounts of data.

In these instances, a data structure dealing with material locations and another dealing with process and control job data were being sent from the supervisory layer to the GUI more frequently than was needed. By being more intelligent about sending these data structures, we have greatly reduced the CPU usage.

Another change that has reduced CPU usage and data traffic is that the user can now set up trace reports to the GUI that are only sent when data changes rather than on a 10 Hz timer.

Additionally, CCF now has a performance monitor class that allows users to monitor performance counters like CPU, Disk usage, and memory usage.

CCF provides history objects for storing certain data to a database. This history includes:

  • Wafer history
  • Equipment Performance Tracking (EPT)
  • Alarms

As a final efficiency enhancement, these objects now share a base class and are more efficient in writing to the database.

Interlocks

Software interlocks are designed to prevent executing an unsafe command. Using multiple levels to do safety checks provides redundancy and reduces the chance an unsafe command could be executed.

Puzzle-pieceThese interlocks are generally based on states and are equipment-dependent. Software interlocks are not a replacement for hardware interlocks. Software interlocks are like a safety net—they are not normally needed, but when they are, there is a much lower risk of damage.
CCF has previously had interlock functionality available. However, in the latest release, the interlock functionality has been consolidated, centralized, and simplified. Using a single interlock class gathers all the interlock code into one location instead of scattering interlock code through all the Components.

Interlocks have been added to each of the CCF samples to show how they work and how they could be implemented in your application.

Conclusion

These are just some of the cool and useful features that have been added to CCF in the last two years since the release of CCF 6.0. To learn more about these features or the other new features that have been added, please schedule a time to talk with a Cimetrix representative.

Contact Us

Topics: Industry Highlights, SECS/GEM, Semiconductor Industry, Doing Business with Cimetrix, Smart Manufacturing/Industry 4.0, Cimetrix Products

Continuous Flow Sample Added to Cimetrix CIMControlFramework

Posted by Derek Lindsey: Product Manager on Oct 27, 2021 11:14:00 AM

Cimetrix CIMControlFramework™ (CCF) is a software development kit (SDK) that enables users to design and implement a high-quality equipment control solution using provided components for supervisory control, material handling, operator interface, platform and process control, and automation requirements. CCF is built on the reliable Cimetrix connectivity products which provide GEM/GEM300/EDA interface functionality.

See previous series of blog posts on the functionality of CCF here.

While CCF does provide a built-in interface to handle GEM300 messages, CCF can be used just as effectively for building back-end and electronics equipment control applications handling the movement of chips and trays rather than wafers and carriers.black-red-chip-1

To demonstrate this ability, Cimetrix has added a continuous flow back-end sample as one of the fully working implementations provided with CCF. If you are already familiar with CCF, you will have seen the front-end Atmospheric and Vacuum cluster tool samples.

The continuous flow sample is different from these other samples as described below.

JEDEC input and output trays

For the Atmospheric and Vacuum samples, material is delivered as wafers in SEMI E87 carriers. For back-end and electronics markets, material is usually not in the form of a wafer and is not delivered in a carrier. For the Continuous Flow sample, the material is delivered on input trays and removed from the system on output trays. All trays used in the sample are similar to JEDEC trays, standard-defined trays for transporting, handling, and storing chips and other components. The trays have slots that can hold material in rows and columns. A JEDEC tray may appear as follows:

Integrated-circuits-tray-1The Continuous Flow sample allows users to specify the number of rows and columns in a tray using configuration parameters. The sample has two input trays and two output trays.

Continuous Flow

industrial-start-panel-1As the name of the Continuous Flow sample indicates, material is continually processed until there is no more material or until the user tells it to stop. The sample does not use SEMI E40 Process Jobs or SEMI E94 Control Jobs to determine how material is processed. Rather the user selects a recipe to use during processing and presses the Start button. Material will continue to be processed until the Stop button is pressed.

By default, the Continuous Flow sample will process all material from the first input tray and then all of the material from the second input tray. When an input tray becomes empty, the empty tray will be removed and replaced with a full one. Similarly, when an output tray becomes full, it is automatically removed and replaced with an empty one. This allows the processing to run continuously until stopped.

Scheduler

The Continuous Flow sample scheduler is different from the schedulers in the Atmospheric and Vacuum samples in that it is not dependent on Process Jobs or Sequence Recipes to know how to move material through the system. It simply picks the next input material and places it in the first available process slot. It then picks the next completed material and places it in the first available output slot.

Visualization

A new visualization was created for the Continuous Flow sample. Rather than using round material, SEMI E87 carriers, load ports, and wafer handling robots, the new visualization draws rectangular material that looks like chips that may arrive in JEDEC trays. Rather than trying to render a robot, the visualization renders a circular end effector that moves material through the system. The following screenshot displays what the sample visualization looks like while processing.

CCF_continuous_flow-1

In an upcoming version of CCF, the components of this visualization will be included in a visualization library that users can employ to customize their visualization more easily than has previously been possible in CCF.

Remote Commands

The Continuous Flow sample comes with three fully implemented remote commands that allow a host or host emulator to run the continuous flow sample. These commands are:

  • PP_SELECT – Specify the recipe to be used for processing material.
  • START – Start material processing using the selected recipe.
  • STOP – Don’t introduce new material to be processed and stop after all processed material has been sent to output trays.

The following shows the S2F49 remote command body for selecting the recipe as sent from Cimetrix EquipmentTest.

CCF_continuous-flow-2

Conclusion

We hope that the new Continuous Flow sample in CCF allows those who are creating semiconductor back-end or electronics equipment control solutions a great starting point for creating their applications. Please contact Cimetrix for additional information by clicking the button below.

Ask an Expert

Topics: Industry Highlights, Semiconductor Industry, Equipment Control-Software Products, Smart Manufacturing/Industry 4.0, Cimetrix Products

Announcing the Release of CIMControlFramework 6.0

Posted by Derek Lindsey: Product Manager on Apr 14, 2021 11:30:00 AM

The Cimetrix Connectivity Group of PDF Solutions is happy to announce that Cimetrix CIMControlFrameworkTM (CCF) version 6.0 is now available for download.

CCF is a software development kit (SDK) that enables users to design and implement a high-quality equipment control solution using provided components for supervisory control, material handling, operator interface, platform and process control, and automation requirements. CCF is built on the reliable Cimetrix connectivity products which provide GEM/GEM300/EDA interface functionality.

We have previously done a series of blog posts on the functionality of CCF. The same great functionality users have come to expect with CCF is still available, but in a cleaner, slicker, easier to use package.

Reorganized directory structure

In versions before CCF 6.0, core CCF packages (packages provided by CCF) were contained in the same directory as sample code and runtime files. This made it more difficult for CCF users to understand what code was required to be customized and what code was basic to CCF. (Note: you can still customize the basic CCF functionality, but it is not required.) In this release, we modified the directory structure to identify more clearly what is core CCF and what is sample or custom code. This is closer to the structure followed by CCF applications. The following diagram shows the new structure:

CCF-6.0-announcement-pic1In addition to clarifying CCF components, the new structure allows us to easily develop samples for additional equipment types. New samples will be added in future versions of CCF.

New WPF framework

Since CCF started providing a Windows Presentation Foundation (WPF) framework, we have received feedback on WPF features user would like added to the framework. Also, our engineers have continued to improve their WPF expertise, which has led to other improvements. CCF 6.0 includes the requested changes and best practice improvements in the new WPF framework. Some of these changes include:

  • Simplified hierarchy which makes it easier to understand which objects to inherit from.
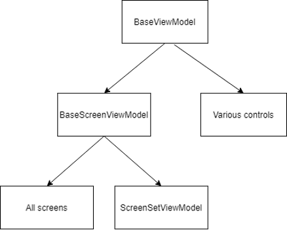
CCF-6.0-announcement-pic2

  • Centralized style elements to allow users to change the look and feel (skin) of the operator interface to meet their needs.
  • Enhanced controls library that provides common controls for use in creating equipment control.
  • Increased E95 compliance, available with a configurable control panel.
  • Accelerated screen creation is possible with the change in hierarchy organization and the enhanced control library.
  • Richer set of native WPF screens. In earlier versions, CCF had several native WPF screens, but also had many screens created with WinForms and hosted in WPF. CCF 6.0 has all native WPF screens in the WPF sample operator interface. These screens can be reused, customized, or replaced. (Note: WinForms screens are also still available in CCF 6.0.)

The following image shows the main screen of the WPF operator interface for the CCF atmospheric equipment sample application. Most of the controls on the screen are available for use and customization by CCF developers.
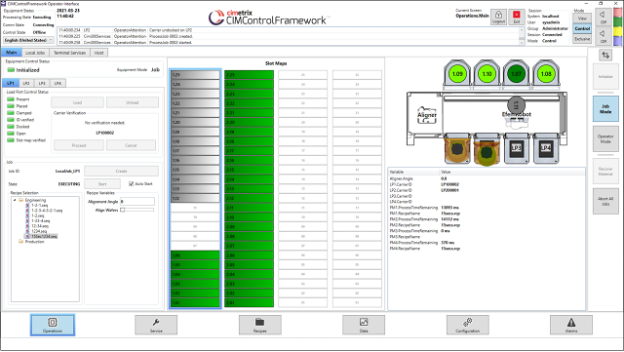
CCF-6.0-announcement-pic3Updated samples

CCF has contained fully functional atmospheric and vacuum sample applications for many years. Over the years, we have improved the functionality for scheduling, simulation, and device interface interaction. However, the samples had always remained the same. With CCF 6.0, the atmospheric and vacuum sample applications were updated to take advantage of the other changes that have been made in CCF. These changes to the samples make them more useful in illustrating the proper use of CCF and providing a better starting point for creating custom applications.

Spring cleaning

CCF was originally released the summer of 2011 making it 10 years-old. Over the years, CCF has had several methods, objects and devices become obsolete. They were not removed from the product for backward compatibility reasons, but they were marked as obsolete. Because CCF 6.0 is a major release, we took the opportunity to do some spring cleaning and remove the obsolete items. CCF is now cleaner and tighter, and using it is much clearer.

Training material and upgrade guide

All the PowerPoint slides, lab documents, and corresponding solutions used for training developers on CCF have been updated for CCF 6.0. We have already successfully used the new training materials with a few customers to help them get started with their equipment control application development.

As part of CCF 6.0, we provide a CCF 5.10 to CCF 6.0 Upgrade Guide that contains detailed instructions on how to migrate applications created using previous versions of CCF to CCF 6.0.

Conclusion

We have been looking forward to the CCF 6.0 release for a long time and are excited for developers to get started using it. We are confident existing users will like the changes and that new users will have a good springboard in getting started with their equipment control application needs. We look forward to working with you and hearing from you.

Topics: Industry Highlights, Equipment Control-Software Products, Smart Manufacturing/Industry 4.0, Cimetrix Products

Best Practices in EDA Metadata Model Design: EDA Exception Consolidation

Posted by Derek Lindsey: Product Manager on Mar 31, 2020 11:45:00 AM

You may be familiar with the brain teaser that starts, “As I was going to St. Ives, I met a man with seven wives.” As the poem continues, each wife has seven sacks, each sack has seven cats, etc. Eventually the question comes out, “How many were going to St. Ives?” The common misconception of this brain teaser is that to answer the question you must multiply all of the items together, resulting in a huge number.

Cimetrix has extensive experience in helping application developers integrate the Equipment Data Acquisition (EDA) / Interface A standards into their equipment control applications. Occasionally we encounter an equipment type that has a very large number of process modules and each process module has a very large number of exceptions. An exception in EDA Freeze II is represented by both an exception definition and an exception instance. What are the options for creating a model with a large number of exceptions?

Good

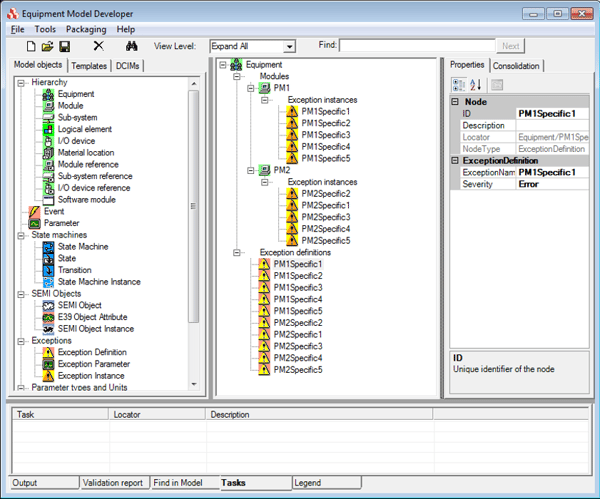
The most direct approach is to have one exception definition per exception instance as shown in the following EDA equipment model:exception-consolidation1However, with this approach, if each module has 5000 exceptions, 200 modules would result in 1 million exception instances with a corresponding 1 million exception definitions. The system resources required to deploy and maintain this model are very large.
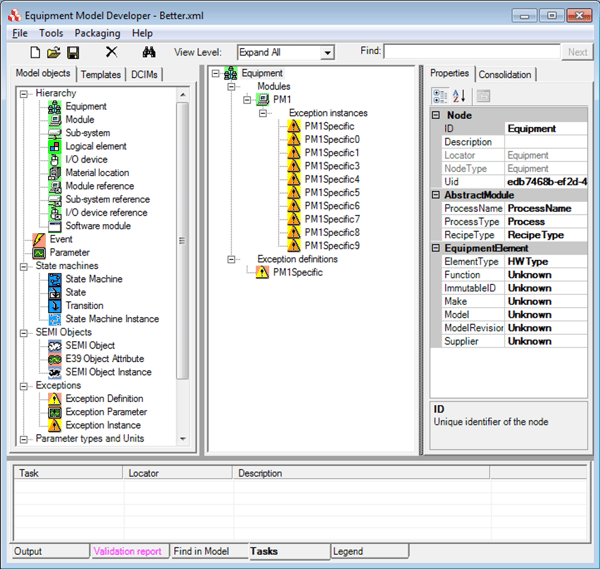
Better

EDA allows multiple exception instances to refer to a single exception definition. The following model shows this approach:exception-consolidation2In this example, we can see that the process module has ten exception instances, but now there is only one set exception definition. Using this approach, if each module has 5000 exception instances, 200 modules would still result in 1 million exception instances, but we would now only have 200 exception definitions (one for each module). This is a significant reduction, but still quite large.
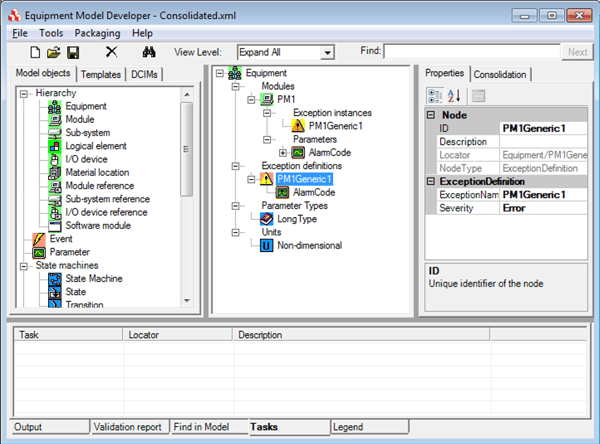
Best

The best approach for equipment with many process modules each with a large number of exceptions is to define only a few distinct exceptions per module, and then use a transient parameter (or data variable) to indicate the actual cause of the problem. The following model shows how this might look:exception-consolidation3The process module in the model above only has one exception. The transient parameter AlarmCode would contain the information about what caused the exception to be triggered. It is possible to have multiple exception parameters if additional information is necessary (sub error code, description, etc.)
The EDA standards reference four exception severity levels – Information, Warning, Error, and Fatal. If we create one exception definition for each of these severities and no more than four exception instances per module, we see that a model with 200 modules would have four exception definitions and an upper limit of 800 exception instances.

This approach to exception consolidation benefits equipment makers and factories alike by reducing model complexity and model size.

The answer to the brain teaser above is that only one person was going to St. Ives – me. You don’t have to spend a lot of time and effort trying to figure out how many people, cats, etc. were in the other party, because they were travelling in the opposite direction! Similarly, if you consolidate your exception handling in EDA, you don’t have to spend a lot of time and system resources trying to handle too many exceptions.

Topics: Industry Highlights, EDA/Interface A, Doing Business with Cimetrix, EDA Best Practices

EDA Programmatic Model Building

Posted by Derek Lindsey: Product Manager on Nov 27, 2019 11:00:00 AM

The Cimetrix CIMPortalTM Plus software product allows users to achieve compliance with the SEMI Interface A standards. This includes E120, E125, E132, E134 and E164. A key element in enabling the data collection provided by Interface A is the equipment model, which has three main purposes:

  1. It defines the structure and relationships of the components that make up equipment (E120)
  2. It defines the data (parameters, events and exceptions) that are available to be used in data collection (E125)
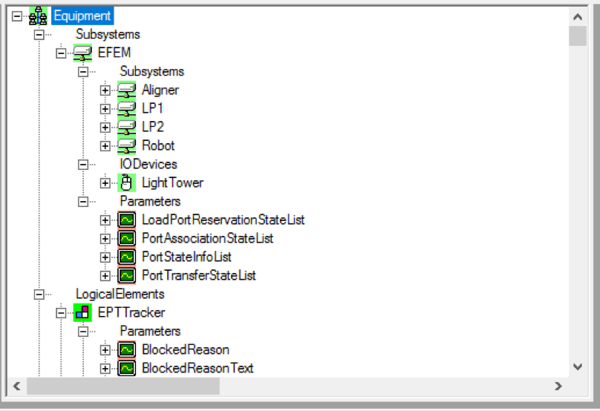
  3. It defines the supporting structures (state machines, parameter type definitions, logical elements, etc.) for creating objects throughout the life of the running equipment (E125)eda-programmatic-model-building-pic-1

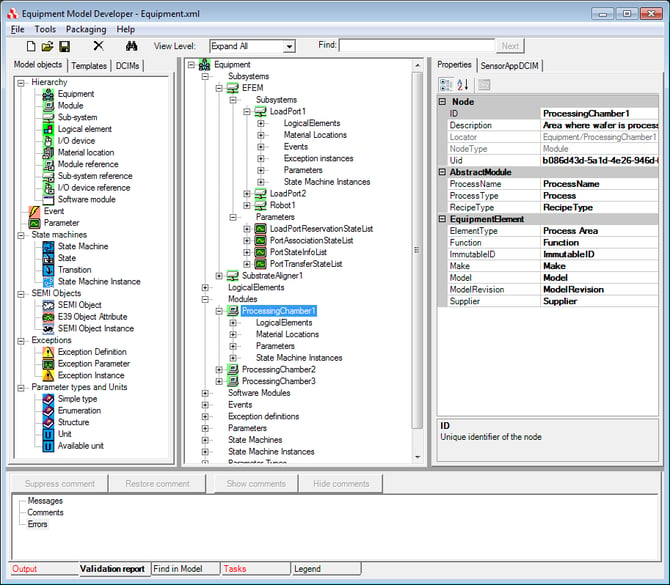
Part of the CIMPortal Plus Software Development Kit (SDK) is an application called Equipment Model Developer (EMDeveloper for short) that uses a simple drag and drop interface to allow CIMPortal Plus users to create a fully EDA-compliant equipment model. This includes making the model compliant with the E164 (Specification for EDA Common Metadata) standard which incorporates best practices from many production EDA implementations by defining common structures and other important conventions for the equipment metadata.

While EMDeveloper makes it simple to create, validate and deploy a fully compliant equipment model, there are times when equipment manufacturers want to provide a more flexible way of creating the equipment model. For example, an equipment manufacturer may offer multiple configurations of a unit of equipment with different arrangements of load ports and/or process module combinations. It is possible for the equipment supplier to save multiple equipment models that are shipped with each equipment, but this opens the door for possible human error in deploying an incorrect model file. It is also possible to create a “master model” that has all possible components defined. When the model is deployed, the equipment developer can use DisableModelNode functionality to disable the components that are not present. However, this approach may also result in errors, and is in the “gray” area of the standards (i.e., it is possible, but not encouraged).

Wouldn’t it be convenient if there was a way to create a model that exactly matched the equipment configuration?

We wouldn’t have a blog post if we didn’t already a positive answer to this question! EMDeveloper uses an API provided by the CIMPortal Plus CxModelLibrary. It does not use any sleight of hand or backdoors to create the equipment model. If a CIMPortal Plus user had the desire to do it, they could recreate EMDeveloper on their own. The API provided by CxModelLibrary allows users to programmatically create an EDA-compliant equipment model that exactly matches the desired equipment configuration.

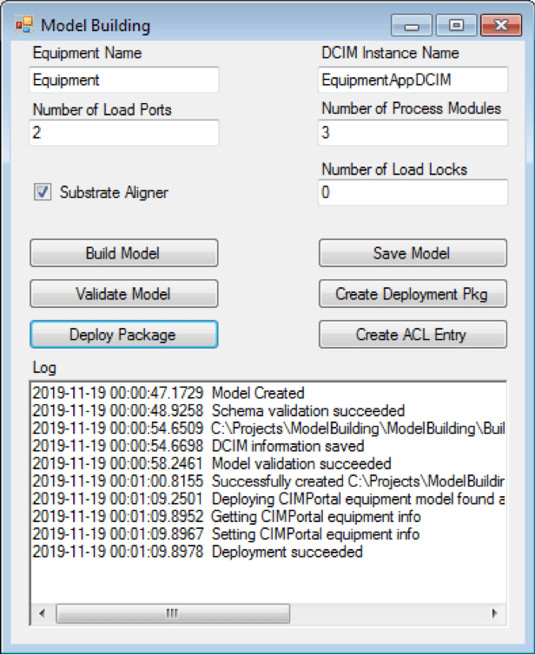
When using programmatic model building, Cimetrix recommends first becoming familiar with the available API and determining the model building approach that works best for your equipment. The Solutions Engineering team at Cimetrix provides a sample application (including source code) that shows how to programmatically build an equipment model. This sample builds an E164-compliant model. In other words, all the expected parameters, events and exceptions and associated structures required by the standards are included as part of the resulting model.eda-programmatic-model-building-2

The EDA standards – and specifically E164 – define the types of data that are required for various components in the equipment. For example, each substrate location in the model is required to implement a SubstrateLocation state model. Moreover, this state model must appear within the equipment node in the model hierarchy that matches the physical structure of the equipment. This sample illustrates best practices in constructing model objects that can be reused based on the type of component. Programmatic model building may take a little more investment up front, but in the end, it can pay big dividends to those equipment providers that may need to change their equipment model on the fly depending on its configuration.

Once a model has been programmatically created/modified, Cimetrix also provides an API for validating the model, deploying the model to be used by an EDA client and creating an Access Control List (ACL) entry to allow a client to securely connect to the interface and gather data.

There is also a provision in the standard for addressing the concern that if the model is updated dynamically, an EDA client may have data collection plans (DCPs) that become out of sync with the modified model. In this case, the client is notified of model changes, and can also be designed to dynamically update the data collection plans based on the changes.

The Cimetrix CIMControlFramework (CCF) product makes use of this programmatic model building functionality. CCF dynamic model building is described in a blog post that you can find here.

To learn more about the EDA/Interface A standards, CIMPortal Plus or programmatic model building, click below and a Cimetrix expert will contact you. 

Topics: Industry Highlights, Semiconductor Industry, EDA/Interface A, Smart Manufacturing/Industry 4.0, EDA Best Practices

EDA Best Practices Series: Choose to Provide E164-Compliant Models

Posted by Derek Lindsey: Product Manager on Aug 28, 2019 11:42:00 AM

In the EDA Best Practices blog series, we have discussed choosing a commercial software platform, using that package to differentiate your data collection capabilities and how to choose what types of data to publish. In this post we will review why you should choose to provide an E164-compliant equipment model.

What is E164?

Equipment Data Acquisition (EDA) - also referred to as Interface A - offers semiconductor manufacturers the ability to collect a significant amount of data that is crucial to the manufacturing process. This data is represented on the equipment as a model, which is communicated to EDA clients as metadata sets. The metadata, based upon the SEMI E125 Specification for Equipment Self-Description, includes the equipment components, events, and exceptions, along with all the available data parameters.

Since the advent of the SEMI EDA standards, developers and fabs have recognized that equipment models, and the resulting metadata sets, can vary greatly. It is possible to create vastly different models for similar pieces of equipment and have both models be compliant with the EDA standards. This makes it difficult for the factories to know where to find the data they are interested in from one type of equipment to another.

Recognizing this issue, the early adopters of the EDA standards launched an initiative in to make the transition to EDA easier and ensure consistency of equipment models and metadata from equipment to equipment. This effort resulted in the E164 EDA Common Metadata standard, approved in July 2012. Another part of this initiative was the development of the Metadata Conformance Analyzer (MCA), which is a utility that tests conformance to this standard. With this specification, equipment modeling is more clearly defined and provides more consistent models between equipment suppliers. This makes it easier for EDA/Interface A users to navigate models and find the data they need.

Power of E164

The E164 standard requires strict name enforcement for events called out in the GEM300 SEMI standards. It also requires that all state machines contain all of the transitions and in the right order as those called out in the GEM300 standards. This includes state machines in E90 for substrate locations and in E157 for process management. The states and transition names in these state machines must match the names specified in the GEM300 standards.

These requirements may seem unnecessarily strict, but implementing the common metadata standard results in:

  • Consistent implementations of GEM300
  • Commonality across equipment types
  • Automation of many data collection processes
  • Less work to interpret collected data
  • Ability for true “plug and play” applications
  • Major increases in application software engineering efficiency

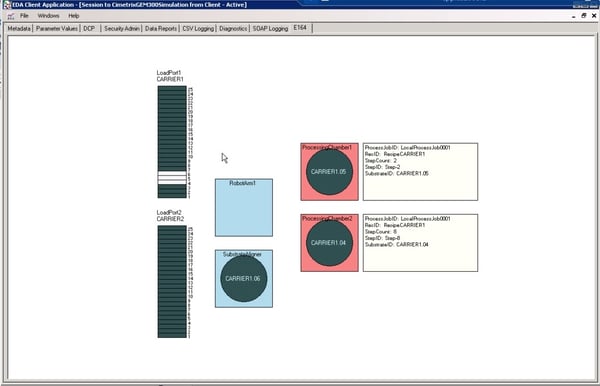
Knowing that a model is E164 compliant allows EDA client applications to easily and programmatically define data collection plans knowing that the compliant models must provide all of the specified data with the specified names. For example, the following application is able to track carrier arrival and slotmap information as well as movement of material through a piece of equipment and process data for that equipment.eda-best-practice-e164-1

This application will work for any GEM300 equipment that is E164 compliant. The client application developer can confidently create data collection plans for these state machines, knowing that an E164-compliant model must provide the needed state machines and data with the proscribed names.

Decide to be E164 compliant

A number of leading semiconductor manufacturers around the globe have seen the power of requiring their equipment suppliers to provide EDA/E164 on their equipment, and now require it in their purchase specifications.

If you are a semiconductor manufacturer, you should seriously consider doing the same because it will greatly simplify data collection from the equipment (and most of your candidate suppliers probably have an implementation available or underway.

If you are an equipment supplier and your factory customers have not required that your EDA models be E164 compliant, you should still seriously consider providing this capability anyway as a way to differentiate your equipment. Moveover, E164-compliant models are fully compliant with all other EDA standards. Finally, it is much easier and more cost effective to create E164-compliant models from the outset than it is to create non-compliant models and then convert to E164 when the factory requires it.

Conclusion

The purpose of the E164 specification is to encourage companies developing EDA/Interface A connections to implement a more common representation of equipment metadata. By following the E164 standard, equipment suppliers and factories can establish greater consistency from equipment to equipment and from factory to factory. That consistency will make it easier and faster for equipment suppliers to provide a consistent EDA interface, and for factories to develop EDA client applications.

Contact Us

Topics: Industry Highlights, EDA/Interface A, Doing Business with Cimetrix, Smart Manufacturing/Industry 4.0, Cimetrix Products, EDA Best Practices

EDA Implementation Insights: What Data Should I Publish?

Posted by Derek Lindsey: Product Manager on Mar 19, 2019 11:30:00 AM

Previous blog posts have discussed the merits of choosing a commercial software platform for implementing the equipment side of EDA (Equipment Data Acquisition) and how you would use that package to differentiate your equipment data collection capabilities from your competitors.

In this post, we discuss how to design the equipment model to contain enough information to make it useful without publishing so much data that it becomes cumbersome for your factory customers to find the data that is most important to them.

Data to Publish

The automation requirements for the most advanced fabs call for the latest versions (Freeze II) of all the standards in the EDA suite, including the EDA Common Metadata (SEMI E164) standard. In addition to providing an excellent foundation for a new equipment model, E164 enables consistent implementation of GEM300, commonality across equipment types, automation of many data collection processes, less work to interpret collected data, and true plug-and-play client applications—all of which contribute to major increases in engineering efficiency. These capabilities benefit both the equipment suppliers and their factory customers alike. Therefore, equipment models should make all E164-compliant data available.

To summarize, those who remember the complexity of implementing SECS-II before GEM came along (pre-1992) will understand this analogy: E164 is to EDA what GEM was to SECS-II.

  • Fab-specified Data

The second blog post made the following statement:

“In effect, the metadata model IS the data collection 'contract' between the equipment supplier and the fab customer."

“This is why the most advanced fabs have been far more explicit in their automation purchase specifications with respect to equipment model content, going so far as to specify the level of detailed information they want to collect about process performance, equipment behavior, internal control parameters, setpoints and real-time response of common mechanisms.”

You only have to read the latest requirements specs for these fabs to get more specifics. Pick the one from your customer base that sets the bar highest and let that be your target.

Data to Avoid in the Model

It is easy to fall into the mindset that if publishing some data through the EDA interface is desirable, the more data we can publish, the better. This is not always the case. In his fascinating book, The Paradox of Choice, Barry Schwartz makes the case that freedom is defined by one’s ability to choose, but more choice doesn’t mean more freedom. In fact, too many choices actually cripple one’s ability to choose. The same can be said of data published in an EDA interface. Making too much data available actually hinders the creation of EDA client applications.information-overload-1-1

We were recently working with a fab to perform a proof-of-concept where we connected an EDA client to a piece of equipment with an EDA interface. We were able to connect to the equipment in a matter of minutes, but finding suitable data to collect for our proof-of-concept took almost an hour because there was so much superfluous data published from the equipment.

Publishing everything including the kitchen sink reduces the ability to create an efficient EDA client application.

Some examples of data to avoid publishing in the model include:

  • Parameters that have no value – If a parameter is available in the model, but the value is not published by the equipment control application, that parameter is just extra noise in the interface. Consider not adding it to the model.
  • Parameters with values that do not change – If a parameter value does not change during the life of the application, it does not make sense to collect that parameter’s data. For example, if an application uses an equipment constant, it may not be necessary to publish that constant through the EDA model.
  • Irrelevant data – If a parameter contains data that is irrelevant to data publication, it should not be added to the model. For example, having parameters in the model that contain the IP address or port number for connection are not very useful in the equipment model. This information is necessary in connecting with an EDA client, but is not relevant for data collection in the model.

The takeaway: Publish data required by E164 and additional fab-specified data, but carefully evaluate other data to be published to make sure it is relevant and useful for data collection.

If you have questions about Equipment Data Acquisition or would like a demo of the functionality described above, please contact Cimetrix to schedule a discussion

You can download an introduction to EDA White Paper any time.

Read the White Paper

Topics: Industry Highlights, EDA/Interface A, Smart Manufacturing/Industry 4.0

SECS/GEM series: Equipment Terminal Services

Posted by Derek Lindsey: Product Manager on Apr 19, 2018 10:27:00 AM

After several articles in the series discussing data collection, events, alarms, recipe management and documentation, this post focuses on the Twitter of the GEM standard – Equipment Terminal Services. We will examine what terminal services are, why they are needed and the mechanics of how they work.

What are Terminal Services?

Equipment Terminal Services allows the factory operators to exchange information with the host from their equipment workstations. The host can display information on the equipment’s display device. It also allows the operator of the equipment to send information to the host. The equipment must be capable of displaying information passed to it by the host for the operator’s attention. 

Why Do You Need This Feature?

An example of when terminal services might be used is as follows:

  1. The host gets notified by the FDC software that the process module had an excursion that needs to be addressed.
  2. The host turns on an operator notification light on the light tower. The notification light needs to be accompanied by a reason that the light was illuminated.
  3. The host sends a terminal message saying that the FDC software detected an excursion and that the operator should address the issue.
  4. Along with the signal tower light, the terminal services notification is active on the tool.
  5. The operator sees and acknowledges the message.
  6. Optional: There are different ways to recover, but the operator could send a terminal message to the host after the issue is resolved.

secsgem-terminalservices-1

How Does Terminal Services Functionality Work?

When the host sends a terminal message to the equipment, the equipment is required to display the message to the operator. The display must be able to show up to 160 characters (even more than can be sent in a single tweet using Twitter) but may display more than that. The equipment’s display device must have a mechanism for notifying the operator that a message was received and not yet recognized by the operator. The message continues to be displayed until the operator recognizes the message. The equipment must provide a method, such as a push button, for the operator to acknowledge the message. Message recognition by the operator results in a collection event that informs the host that the operator has received the information. The equipment application is not required to interpret the data sent from the host. It is solely information meant for the operator.

If the host sends a new message is sent before the operator acknowledges a previous message, the new message overwrites the previous message.

The host may clear unrecognized messages (including the indicator) by sending a zero-length message. The zero-length message is not considered an unrecognized message.

The equipment must also allow the operator to send information entered from the operator’s equipment console to the host. 

Which messages are used?

Message ID Direction Description
S10F3 H->E Host sends textual information to equipment for display to the operator on a terminal
S10F1 H<-E Operator sends text message to host
S10F5 H->E (Optional) Host sends multi-block display message. If multi-block is not supported, the equipment responds with an S10F7 message that multi-block is not allowed.
S6F11 H<-E Equipment sends collection event to the host notifying the host that it has recognized the message


Click here to read the other articles in our SECS/GEM Features and Benefits series. 

To download a white paper on an introduction to SECS/GEM, Click below:

SECS/GEM White Paper

Topics: SECS/GEM, SECS/GEM Features & Benefits Series

Equipment Control Logging Benefits

Posted by Derek Lindsey: Product Manager on Mar 8, 2018 11:02:00 AM

markets-timber-logging.jpg

Equipment control applications are highly complex and have many moving parts that require a high level of coordination. Because of the high degree of difficulty, problems are bound to crop up. Sometimes the problems are related to a hardware issue. Sometimes the problems are caused by operator error. Sometimes problems are timing related. Sometimes problems happen infrequently. Regardless of the frequency or the cause of the errors, how do you go about debugging issues that happen in the field if you are unable to attach a debugger to the application?
 
The answer is logging.

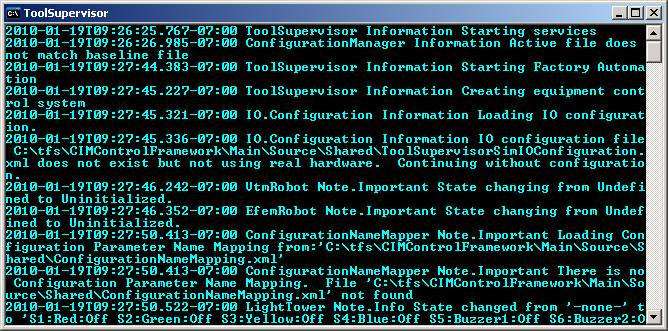
As part of the CIMControlFramework (CCF) product for creating equipment control applications, Cimetrix developed a logging package. Our logging package has two parts – collecting the log messages and analysis of the messages.

The logging package allows you to assign a source and a type for each log message. The source specifies where the log message originated. The type is a category that can be used to route the log 

messages to specific output locations called log sinks. We have found the most useful log sink to be a text-based log file. The logging package can be configured for the types of messages to log. It can also be configured for how long to keep log files and how many to keep. This helps keep hard drives from getting too full.

logging.bmp

The temptation for many users is to enable all log messages while developing the equipment control application and then turn all the logging off when the equipment ships to the factory. Cimetrix recommends leaving as much logging enabled as possible. This will help you avoid trips to the fab when a problem arises that can be solved via the logging package. Some clients worry about resource usage by the logging package. We have found that the impact of the logging package is light enough that it is advantageous to leave it on all the time.

The Cimetrix logging package was such a success in CCF, that we have started using the logging package in all Cimetrix products. The logging package has earned rave reviews from Cimetrix product users. Here are a few quick examples that show how valuable logging is:

1. An OEM customer called in a panic because because an end user was withholding payment due to a timing/throughput issue in the application. Together Cimetrix and the OEM reviewed the log file. Using some of the LogViewer analysis tools we were able to isolate and identify the problem within 30 minutes. The OEM was able to confidently tell the end user that they had found the problem and a fix would be available within the next software release. Because the OEM was able to support them so quickly remotely, the end user had confidence in the OEM and released the payment.

2. At Cimetrix, we often hear, “This only happened once, but…” With logging always enabled, it is possible to diagnose problems after the fact. This is especially important for problems which occur infrequently. Users of the Cimetrix logging package are able to resolve issues that happen only rarely.

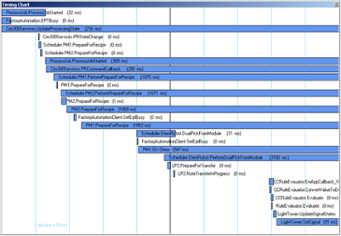
3. Occasionally an equipment control application will deadlock – two different modules are waiting on each other and neither is free to proceed. Using the LogViewer’s Callstacks plug-in, in conjunction with the Timing Chart plug-in, make the process of diagnosing the deadlock much easier.

logging-1.png

4. An end user called up their OEM equipment provider because the software stopped unexpectedly. They wanted to OEM to put someone on a plane immediately to come diagnose the problem. The OEM was able to view the log file to see that an operator had stopped the tool without the supervisor realizing it. When asked, the operator confirmed he had stopped the tool. Crisis averted. No plane ride required by the OEM to satisfy their customer!

5. A client came to Cimetrix for a training class. This client brought in a contractor to attend the class as well. Part of the Cimetrix training was used to review the logging package. During a break in the training, the contractor approached the instructor and asked if he could purchase the logging package separately for use in his other contracts because he could see several applications that would benefit from the power of the logging package.

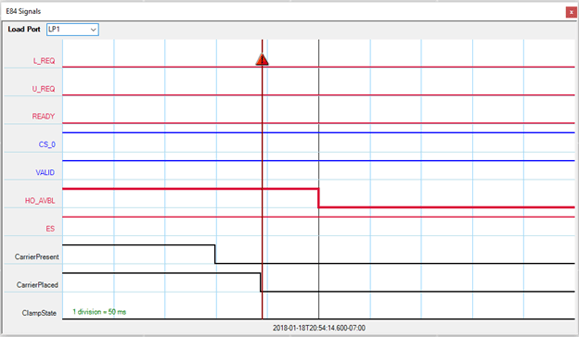
6. Cimetrix is continuing to add useful plug-ins to the LogViewer. We recently added an E84 (automated material handling system) plug-in to assist in implementing and debugging material transfer. LogViewer allows users to implement their own custom plug-ins for analyzing data important to them.

logging-2.png

These are just some of the success stories we have heard about in relation to the logging package. With equipment control applications and factory automation, there will always be issues to be addressed and opportunities to root cause unexpected behavior. Having a powerful logging package makes that process much easier.


Topics: Equipment Control-Software Products, Customer Support, Cimetrix Products

SECS/GEM series: Data Polling

Posted by Derek Lindsey: Product Manager on Jan 24, 2018 11:30:00 AM

GEM is an industry standard, which defines standard methods to communicate between process equipment and factory host software for monitoring and controlling purposes. By connecting GEM equipment, factories can immediately experience operational benefits. Factory hosts can collect data in multiple ways. A previous blog post discussed collecting data by using collection event reports where data is pushed to the host based state transitions performed by the equipment. In addition to event reports, the factory host often has a need to poll the equipment for current data values. Data values can be directly requested by the host, or can be sampled on a periodic basis in a trace report. This is called Data Polling and is the topic for today's discussion.

datapolling_281485322-.jpgTypes of Data

There are three types of data in a GEM interface:

  • Data Variable (DV) – data items that can be gathered when an equipment event occurs. This data is only guaranteed to be valid in the context of the event. For example, the GEM interface may provide an event called PPChanged (triggered when a recipe changes). The interface may also provide a data variable called changed recipe. The value of this DV is only valid in the context of the PPChanged event. Polling the value at a different time may have invalid or unexpected data.
  • Status Variable (SV) – data items that contain information about the equipment. This data is guaranteed to be valid at any time. For example, the equipment may have a temperature sensor in a process module. The GEM interface may provide a ModuleTemperature status variable. The host can request the value of this SV at any time and expect the value to be accurate.
  • Equipment Constant (EC) – data items that contain equipment settings. Equipment Constants determine how equipment will behave. For example, a GEM interface may have an equipment constant called MaxSimultaneousTraces which specifies the maximum number of traces that can be requested simultaneously from the host. The value of equipment constants is always guaranteed to be valid and up to date.

Data Properties

Each of the three data types listed above have similar properties that help define the data. The equipment supplier is responsible for providing these properties in a GEM manual so that the factory host will be able to interact with the data. Some of the important data properties are:

  • ID – a numeric ID that must be unique in the GEM interface. These IDs can be grouped by data type and are referred to as SVIDs (Status Variable IDs), DVIDs (Data Variable IDs) and ECIDs (Collection Event IDs).
  • Name – a human-readable name for the data item
  • Format – the data type of the item. 
    • Data formats can be simple (numeric, ASCII, Boolean) or complex (arrays, lists, structures). For example, numeric types can be I1, I2, I4, I8 (signed integer types of different byte length), U1, U2, U4, U8 (unsigned integer types) and F4 or F8 (floating point types). 
    • List and array types contain multiple values in the data item. For example, image data would be formatted as a byte array. 
    • Structure types contain a specific type of data. For example, a variable may represent a slot map which contains carrier information as well as a list of slots and their wafer placement status.
  • Value – the actual value of the data item. Data values are in an accurate, efficient, self-describing binary format so that the host will know how to interpret the data. The data format allows for collection of more data more efficiently.

Collection Events (CE) and Alarms also have IDs and names. These items are discussed in other blog posts, but it is important to know about some of the properties for this post because these properties can be queried as well.

Data Polling

As mentioned, the factory host will often get data on a regular basis through trace reports and event reports that it defines. GEM also provides a method for the factory host to poll data based on its needs.

Status Variables

The host can query the value of status variables at any time by sending an S1F3 message containing a list of SVIDs for which to obtain the value. If the list has a length of one, only the value of the single SV will be returned. If the list has a length of zero, the values of all SVs defined in the interface will be returned. The values are returned in a list in an S1F4 message from the equipment.

The host can also request a list of SV names from the equipment by sending an S1F11 message to the equipment. The list rules mentioned above apply to this message as well. The return message will contain an entry for each SV that displays its SVID, Name and Unit.

Equipment Constants

Similar to the way SVs work, the host can also query the values of equipment constants defined in the GEM interface by sending an S2F13 message. The values will be returned from the equipment using an S2F14 message.

Also similar to SVs, the names of ECs can be queried using an S2F29 message.

Data Variables

Since data variables are only valid in the context of a collection event, there is not a method for polling values of data variables. The value of a Data Variable can only be reported in a collection event report.

Other

In addition to the methods for polling data discussed above, the following items can also be obtained from a GEM host by polling the equipment:

  • Collection Events (CE) – The host can query what Collection Events are available on the GEM interface along with what DVs are associated with each CE. These are requested using the S1F23 message.
  • Alarms – The host can query what Alarms are available on the system by sending an S5F5 message listing the ALIDs of the desired alarms. The return message lists the alarm code and alarm text associated with the ALID. Two status variables are required to be present in every GEM interface. AlarmsEnabled contains a list of IDs of all enabled alarms on the equipment. AlarmsSet contains the list of ID for alarms on the equipment that are currently in the Set state. Since these values are status variables, they can be queried at any time.
  • MDLN and SOFTREV – The response to an S1F1 (Are you there?) message will contain the equipment model type (MDLN) and software revision (SOFTREV) for the equipment.
  • DateTime – The date and time for the equipment can be requested using an S2F17 message. The host can synchronize the equipment’s time using the S2F31 message. GEM requires the equipment to maintain a Clock SV containing the current time. Allowing the host to query and synchronize time provides the capability to order nearly simultaneous events on the system.

Trace Data Collection

Trace data collection provides a method of sampling data on a periodic basis. The time-based approach to data collection is useful in tracking trends or repeated applications within a time window, or monitoring of continuous data.

When creating a trace definition, the host provides the following:

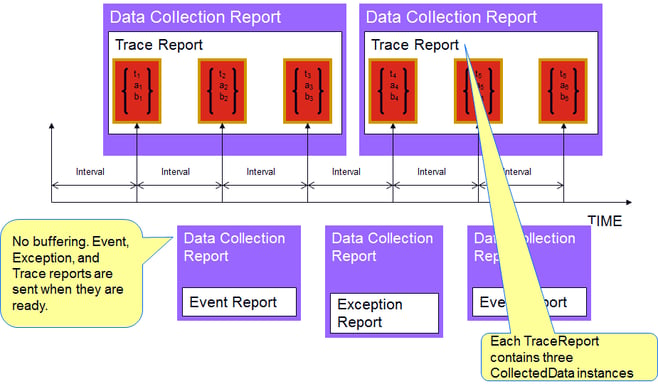
  • Sample period – the time between samples. The resolution is in centiseconds, so it is possible to gather data very quickly using a trace. It is common for equipment so support as fast as a 10 Hz trace interval.
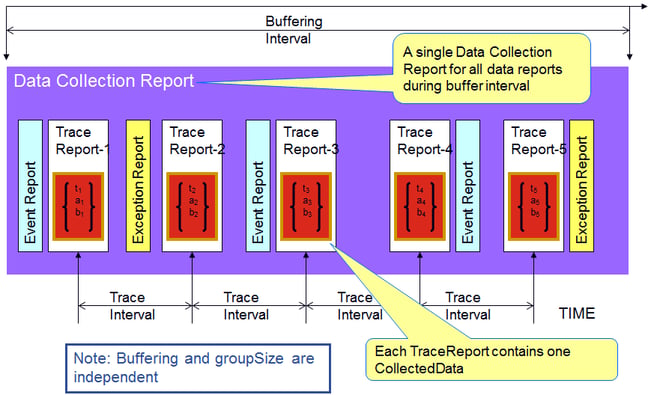
  • Group size – number of samples included in a trace report
  • SVIDs – List of status data to be included in the trace
  • Total samples – number of samples to be taken over the life of the trace
  • Trace request id – identifier of the trace request (GEM only allows trace IDs of type integer)

The host defines a trace request by using the S2F23 message. Trace reports are sent from the equipment to the host using the S6F1 message.

Trace Sample

Let’s suppose that a piece of equipment is processing a wafer and the processing takes 5 minutes. It is important to keep the chuck temperature within a certain acceptable range and to make sure that the chamber pressure stays below a specified level. It is sufficient to monitor the values at 15 second intervals, but we can create groups of data to only receive reports once a minute. The host could send an S2F23 message with the following trace configuration:

Trace ID: 100 (ID must be an integer)
Sample Period: 00001500 (take a sample every 15 seconds)
Total Samples: 75 (Samples every 15 seconds for 5 minutes)
Group Size: 4
SVID List:
   300 (ID of the status variable that contains information about chuck temperature)
   301 (ID of the status variable that contains information about chamber pressure)

After one minute, the first trace report will be delivered using an S6F1 message from the equipment. The message will contain the following information:

100 (Trace ID)
4 (last sample number)
2018-01-22T14:20:34.8 (date format depending on TimeFormat equipment constant)
Status Value List: (Length is 8: 2 SVs with a group size of 4)
   219.96 (chuck temperature for first sample)
    0.0112 (pressure for first sample)
   219.97 (chuck temperature for second sample)
   0.0122 (pressure for second sample)
   219.97 (chuck temperature for third sample)
   0.0120 (pressure for third sample)
   219.96 (chuck temperature for fourth sample)
   0.0119 (pressure for fourth sample)

After another minute the trace report may look like the following:

100 (Trace ID)
8 (last sample number)
2018-01-22T14:21:34.8 (date time shows one minute later than the first trace)
Status Value List: (Length is 8: 2 SVs with a group size of 4)
   219.96 (chuck temperature for fifth sample)
   0.0112 (pressure for fifth sample)
   219.97
   0.0122
   220.01
   0.0120
   220.00
   0.0119

Three more reports will be received at one-minute intervals. The host can check returned values in the report and react accordingly if values are out of the expected range.

Conclusion

The host could poll status data using S1F3 if it wanted to check a value at a given point in time. It can set up a trace if it wants to continuously collect data over a given period of time.

Using the data sampling methods outlined in this blog will allow host applications to poll the data they need when they need it. GEM provides flexibility in requesting data from the equipment either by allowing the host to query values at a given point in time or to be sampled on a periodic basis using a trace.

Click here to read the other articles in our SECS/GEM Features and Benefits series. 

To download a white paper on an introduction to SECS/GEM, Click below:

SECS/GEM White Paper

Topics: Industry Highlights, SECS/GEM, Smart Manufacturing/Industry 4.0, SECS/GEM Features & Benefits Series